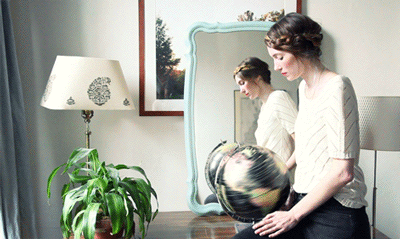
Showing posts with label beauty. Show all posts

Your New To-Do

Are you feeling blue? A little down? Like a party popper? Unpoopular? (If you have no idea what I'm talking about, watch this RIGHT NOW. Then come back and finish reading.) Brighten up:

1. Soak in a bath for an absurdly long period of time. Bring a good book and clean, fluffy towels.
2. Swipe on red lipstick. It will boost your confidence so much that you'll smile at your reflection in every single window. Don't you feel better just thinking about that?
3. Organize your desk. A happy byproduct: your thoughts will be a tad less chaotic.
4. Order a cappuccino...to stay. No need to go on your merry way when there's foam to stir and sip. Sit down. SIT. DOWN.


[photo cred to 1, 2, 3 and 4]

Speak Now: On Fashion


Girls do not dress for boys. They dress for themselves and, of course, each other. If girls dressed for boys they’d just walk around naked at all times.

- Betsey Johnson


Sometimes, it seems that not everyone takes my work as seriously as I do. Some don't consider it serious journalism, or they assume that I spend my days playing with lipstick.

Others think that fashion doesn't demand the same rigor and attention that topics such as politics and international events do. This may be true to a certain extent, but I don't think it means that fashion and beauty are insignificant. I believe that both are related, and both have an impact on how you're perceived and how you carry yourself. You can't judge a book by its cover, but you also can't discount the benefits of making a good first impression. I got my job thanks to a great first impression on a beauty editor who made a wonderful first impression on me (clearly). Beyond that, how you perceive yourself informs self-image and confidence, both of which are vital for everything from job performance to learning ability. Beauty is one of the most accessible ways for women to boost self-confidence in even little ways, whether it be by swiping on lipstick or spritzing perfume. Is this less important than the third victim of Herman Cain's alleged sexual harassment or the verdict of Dr. Conrad Murray's trial? Should this easy way to improve a woman's self-confidence go ignored?

Fashion, too, goes further than the spectacle of runway shows and passing trends. Throughout history, it has reflected culture and identity. It can denote the values of an era (high-collared dresses of Victorian wear) and social status (constrictive corsets, representative of the repression of women). Fashion is a form of expression of all of these things, as well as a manifestation of individual beliefs and tastes. Often, fashion is painted as a trivial indulgence, but it's a freedom and a privilege to be able to wear what we choose. It has its excesses and controversies; find me an industry that doesn't. At its core, though, fashion is a way to present and represent yourself in a subtle and unique manner. Regardless of where you're from or how much you earn, you can define yourself with what you choose to wear.

I've struggled with this for a bit—people don't consider fashion and beauty writing to be hard-hitting journalism or an intellectual field. I may not be reporting on a precedent-setting court case or giving a how-to on the newest version of the iPhone, but, in my own small way, I'm providing the tools for a woman's improved self-perception and increased confidence.

Plus, I play with lipstick about 4% of the time—and that 4% is awesome.

[photo cred here]

At First Blush

There's a new makeup trend. I find these things out while I'm working. When I say "working," I usually mean painting my nails for a mini photo shoot or getting my eyelashes dipped in something or other. Sometimes, "working" means writing. I understand if someone wants to reach their arm through the computer and cyber-slap me.

Anyway, as I was saying: new makeup trend. Blush is on the up and up—literally. It's gone from the apples of the cheeks to the cheekbones and now, to the temples. Here's a prime example:

Pretty? Yes. Easy to pull off? No. Depending on placement and saturation, blush at the temples can have a sickly effect. Worst case scenario, it resembles a rough case of pink eye. Which is neither cute nor comfortable.

However, a few tweaks make it surprisingly easy to try in real life. Just keep a few things in mind: don't wear eyeshadow. At this height, blush does double-duty as rouge and eyeshadow. Secondly, try sweeping it from the cheekbones to the temples, as shown below. That way, you get the best of both worlds. Lastly, commit. A wimpy patch of pink is going to look exactly that: wimpy. Here, the perfect real-world execution of this trend:
Would you be game to try? Or is it too over-the-top?


[photo cred here and there]

Nailed It + A Giveaway

You know what feels great? Getting a fresh manicure and
waving your hand around like you're the Queen of England.


You know what also feels great? Persuading 200 poor Google followers/fellow bloggers to read my endless prattling about my life and/or objects that I find pretty. To celebrate, I'm throwing my very first giveaway: two fabulous Estée Lauder nail lacquers. The first is Metallic Sage, a very of-the-moment green-grey hue, and the other is Purple Passion, a vibrant lavender shade.
To enter, you must a) be a follower of Mellow Fever and b) comment on this post with your email (if it isn't available in your blog profile). If you Tweet about it, tag it with @deannapai and a link to this post for a second entry. A winner will be randomly selected on Friday. Bonne chance, mes petits choux!


(open to US residents only, sorry!)
[photo cred here + courtesy of Estée Lauder]

Note to Self

Don't forgo a little polish in the morning...

...because you never know when you're going to find yourself in Goldie Hawn's apartment, having a conversation with Melanie Griffith and sipping lemon water. When I interned at Allure, whipping out my favorite Nars lipstick in Flamenco became second nature. Now, I'm lucky if I can get clothes on before I tear out of my apartment, Tasmanian Devil-style, and run to the office/a meeting/an event. I realized today, while sitting on Goldie Hawn's couch and thanking God that I didn't wear an old Theory dress that totally has a stain on it, that I just feel more confident and put-together when I swipe on a bit of makeup (and don't wear clothes that are in dire need of a dry-cleaning). Hi, red lipstick. Hi, mascara. Hi, primer. Hi, laundry detergent/dry cleaner around the corner from my apartment. Let's play.


[photo cred here]

Temporary tattoos!


These days, I'm smitten with all the clever tattoos out there, but I'm too wussy to get a permanent one. So I was THRILLED to discover tatt.ly, a new online shop offering awesome, designy temporary tattoos.

Which would you wear?

Sexy eyebrows (yes, eyebrows)

Oh my goodness, how gorgeous are these dramatic eyebrows? When I saw these stunning photos of Oscar de la Renta's recent runway show, my jaw dropped. Makeup artists often insist that eyebrows are the most important part of your look, since they frame your face and can make your eyes look bigger and make your face look younger. Wouldn't you love to recreate these sexy bold brows for a night out?

Happily, my make-up artist friend Suzy Gerstein shared the two steps to getting the look: "The secret to a gorgeous full brow is to layer products. First, sketch in any sparse areas with hairlike flicks of a brow pencil. Use the skinniest, pointiest pencil you can find, so your drawn-in 'hairs' will look natural. My favorite is the Kevyn Aucoin Precision Brow Pencil. Then layer a powder color over the pencil. Two colors that work well for brows: MAC eye shadow in Brun (for brunettes) and Concrete (for blondes)."

What do you think, my lovelies? Would you dare? xoxo

(Photos by Jamie Beck. A similar red lipstick is Rouge Dior in Red Muse)

Feathered Fancies

I'm going to be up front about this: I'm pining for feather hair extensions. I'm fairly easy on my hair; I dyed it once, a color I thought was auburn but actually closer to an unfortunate shade of purple. My mom convinced me to go back to dark brown by pointing out that my hair didn't match my eyebrows. After that, that was all I could see in the mirror (my mother knows me very well). In comparison, feather hair extensions are a breeze.

However, this desire for feather hair extensions does not mean I want to look like I got on the wrong side of a pack of pigeons or was dragged backwards through the brush. For foolproof feathering, here are a few tips:
1. Neon pink feather extensions look like neon pink feather extensions. They also look as though you tried too hard to fit in when you went to a B-52s concert (in the hopes of hearing Love Shack played live, of course).
2. Therefore, find feathers that are as natural-looking as possible, ideally with shades that riff off your own hair color. This set of five loose feathers can work with anything from dirty blonde to dark brown.
3. Wear feather extensions with your hair loose and casual. These are not for the workplace (unless you're a beauty assistant)(eh, eh?)(just kidding)(kind of). Avoid perching a flock of feathers in upswept hair; a few can be elegant, but the look can turn a bit madcap, à la Marie Antoinette. She wore so many miniature birds in her updos that they had accompanying cages.
4. Don't have time for DIY feather extensions? A pair of long earrings, such as these pearl feather earrings, accomplish the look in seconds.

The key here, as with so many other things, is to keep it subtle. I am not a bird. I'm just a human being with a really big weakness for feathers.
[photo cred here]

Do or don't: Pale skin this summer

As summer approaches, I usually get a little shy about wearing shorts and exposing my so-white-they're-almost-blue legs. When I was in college, I even went fake tanning (yikes!) and slathered on orange self-tanner (not a good look).

But this summer, I've decided to embrace my pale skin and freckles. We've recently discovered a few great natural, chemical-free sunscreens: Badger, Dr. Robin and the Babo Botanicals stick (which is super easy to apply on babies!), and wear them everyday.

My darlings, this summer, will you rock the pale look? Would you prefer to get a tan? Have your feelings on tanning changed? What kind of sunscreen do you use? I'd love to hear...

(Photo by Garance Dore)

Tattoo girls

Although I'm not a tattoo girl myself, I'm loving these clever and charming tattoos. What do you think?

P.S. Nine awesome tattoos...
P.P.S. New Yorkers, come join me at this bike ride this Thursday! xo

(Via Tattoologist)

DIY wedding hair: Gibson roll

My dears, I'm excited to share our second wedding hair tutorial! My friend (and hair genius) Caroline adores this elegant twisted roll--and swears it's easy enough for brides to do themselves. So, we met at my favorite West Village wedding shop, and the wonderful Jamie Beck took photographs. Doesn't her hair look straight from the 1940's? So romantic.

Here are Caroline's steps, if you'd like to try it out...
This hairstyle is perfect for a black-tie wedding or to show off a pretty neckline--and it's great for girls with curly hair. It's super easy; I promise with the teensiest bit of practice, you'll be able to do it in less than five minutes!

1. Gather your hair into a low ponytail and secure with a rubber band. You want the ponytail to be pretty tight.

2. Next, slide the rubber band down the ponytail a little, so there's space between the rubber band and your scalp.

3. Create a little "hole" in the area above the rubber band. Make sure not to poke all the way through; you just want to make a little "nest" in your hair (which you'll use in step 5).

4. Twist the length of your ponytail, like you would if you were making a bun.

5. Begin tucking your ponytail down into the little nest you made for it. (To make mine a little different, I tucked the hair off center, so it was slightly asymmetric.)

6 and 7. Keep tucking and rolling your ponytail into the nest...

8. Once you have all your hair hidden and tucked away, pin it in place with bobby pins. Don't forget to pin the sides of the hairstyle as well. Then spray your hair with some hairspray, and take along extra bobby pins for touch-ups!

Voila! Isn't it beautiful? Would you consider this wedding look? If you're already married, how did you wear your hair at your wedding? xo

P.S. The lovely Caroline is offering Cup of Jo readers 20% off her jewelry line, Brvtvs. Enter the code CUPOFJO, good until July 7th.

P.P.S. More pretty hair tutorials...

(Photos by Jamie Beck for Cup of Jo. In the step-by-step photos, Caroline is wearing an Eberjey robe. In the wedding photos, Caroline's wedding dress is by Ivy & Aster from Lovely, a bridal boutique in the West Village. The hair piece is by Untamed Petals, available at Lovely, as well.Her jewelry is from her own line, Brvtvs, and her lip color is NARS lipstick in Manhunt--appropriately!:)

Random beauty tip

I used to be so sleepy at the end of the night that I'd skip washing my face and just tumble into bed. But then a friend recommended these cucumber towelettes, and, I have to say, they've totally improved my bedtime routine. You just wipe your face (no water required), and they remove makeup, moisturize skin, smell amazing, and make you feel fresh and revitalized.

Have you ever used them? What's your bedtime beauty routine?

Lilac polish

Toby and I went on a walk early this morning and spotted this beautiful lilac nail polish on two different gorgeous women. (Maybe it's the new "it" color?) It looked so light and lovely, and was a nice change from red and pink. I'm going to pick up a bottle today and plan to wear it all summer. What do you think? xo

P.S. I never used to be that into nail polish, but the colors are so amazing this year.

(Photo by Sparkles and Bows)

DIY wedding hair: Chestnut bun

When I got married, I never would have thought of doing my own wedding hair, but my friend (and hair genius) Caroline swore this beautiful chestnut bun was simple enough for brides to do themselves. So, I invited her to a West Village wedding shop to explain the steps (and play dress up), and the wonderful 
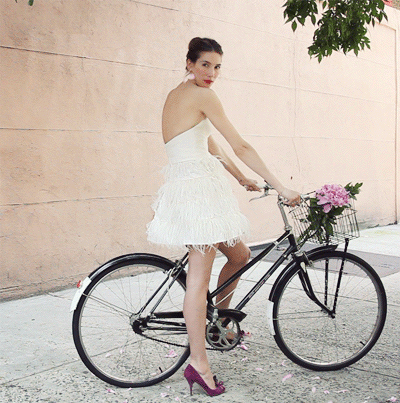
Jamie Beck took photographs. Doesn't the elegant bun look like something Grace Kelly would wear? Would you wear it?

Here are Caroline's steps, if you'd like to try it out...
1. Gather your hair into a high ponytail and secure it with a rubber band. You want the band to be pretty tight (otherwise the sides of the ponytail will droop after you do step three).

2. Next, slide your rubber band down a little so it's no longer tight against your scalp.

3. Create a little "hole" in the loosened part of your hair (between your scalp and the rubber band).

4. Pull your ponytail through the hole you just created.

5. Note: Be sure to pull the ponytail UP through the hole (instead of DOWN through the hole, like the topsy-tail we used to do in the 80s:)

6. Pull the ponytail all the way through so it hangs over the top of the rubber band. You may have to fan out the ponytail a little to create an even shape.

7. Next, loop the end of the ponytail under, towards the rubber band. If your hair is super long, you may have to wrap the ends of the ponytail around your hand a few times before you tuck it under. (I did!)

8. Pin the ends that you just tucked using a few bobby pins. Make sure it's pinned very securely. Then keep pinning the sides and bottom of the bun until it feels secure. You can spray with hairspray for extra hold, and feel free to bring some extra bobby pins for touch-ups throughout the night.
Voila, that's it! What do you think, my dears? Would you do your own wedding hair? Isn't this surprisingly simple? xo Thank you, Jamie and Caroline! And most of all, congratulations to all you brides-to-be out there!
P.S. More hair tutorials...

(Photos by Jamie Beck for Cup of Jo. In the step-by-step photos, Caroline is wearing an Eberjey robe. In the wedding photos, Caroline's adorable wedding dress is by Ivy & Aster from Lovely, a bridal boutique in the West Village. Her jewelry is from her own line, Brvtvs, and her red lipstick is Rouge Dior Lipcolor in Red Muse.)

Summer nail polish

Refinery29 just wrote about the six coolest nail polish trends, and I'd love to try baby blue and very, very pale pink (I actually wore this exact pink at our wedding). Wouldn't they look pretty peeking out of sandals?

Do you have a nail-polish color you swear by?

A braided crown

I'm excited to share another hair tutorial! Heidi braids, which go across the top of your head, are beautiful, but my friend Caroline wears hers in a different way: like a crown circling around her head. What a breezy summer style! She looks like a Danish princess. So I invited her over to explain how to do them, and the wonderful Jamie Beck took photographs.

Here are Caroline's steps, if you'd like to try it out...
1. First, part your hair into two sections. To make the look softer, I like to make a diagonal part in the front (starting sort of near the arch of my left eyebrow, going towards the middle of the crown) and then bring the part straight down the back.

2. Braid the two ponytails, and secure each with a small rubber band.

3. Make sure the tops of the braids are pretty loose (you don't want that part pulled too tight or you'll be able to see the part line going down the back).

4. Take the braid on the right and wrap it around the front. Wrap it low and loose near your front hairline (versus on the top of your head).

5. Pin the braid in place with bobby pins. I like to use mini ones, but if you have thick or unruly hair, bigger pins will work better.

6. Take the second braid and wrap it around the back. Again, I like to keep it low and loose so it sort of flows into the front braid.

7. Pin in place. If your hair is long enough, tuck the end of each braids behind the other braid (right where they meet) and pin to hold. Voila!
What do you think, my darlings? These pretty braids are perfect for summer bike rides and taking photos around town. (Your hair stays out of your face, but you still look adorable.) Thank you so much, Caroline and Jamie. xoxo

P.S. Three past hair tutorials, including the perfect ponytail!

(Photos by the fabulous Jamie Beck for Cup of Jo. Caroline's jewelry is from her own line Brvtvs, and her lip color is NARS lipstick in Niagara. She also used this hairspray to make her hair shiny.)

Perfect nails

My friend Leigh always has pretty nail polish, but my jaw dropped when I saw her glittery gold manicure. They're actually Sally Hansen nail strips, which you apply like stickers! So they never smudge and don't need drying time. Aren't they amazing?

(Photo by Marvelous Kiddo)

Heidi braids with fabric

How pretty are these heidi braids from the Rachel Roy fall 2011 show? Refinery 29 just did a great tutorial. (And it would be cute with the new heart scarf from ban.do.)

P.S. More pretty hair!

(Photos by Dan McMahon for Refinery29)

What perfume do you wear?

My friend Alison came over yesterday and smelled like a field of wild roses and pink peonies. Her secret? Chloe Chloe perfume. The scent was light, romantic and just perfect. I'm going to head over to Sephora and pick up this little rollerball version today.

Which kind of perfume do you wear, my lovelies?

P.S. My favorite quirky perfumes.

Braided top bun

Whenever I'm walking around downtown New York, I see tons of cute girls wearing buns on the tops of their heads. Well, what could be even better than a top bun? A braided top bun! My friend Caroline, a hair genius, came over to explain exactly how to get this easy spring look, and the fabulous Jamie Beck took photos.

Here are Caroline's easy steps...
1. This simple hairstyle is perfect for a warm spring day, when you want to keep your hair cool and off your neck. First, part your hair in a deep side part (instead of combing it back smoothly). This makes it look a little less fancy, perfect for bike rides or Sunday picnics. Then gather your hair into a ponytail on top of your head. The higher, the better.

2. Make a loose braid all the way down the tail. Don't braid it too tightly; a little messy is perfect and it will help it look less "ballerina." Secure the end with a rubber band; I recommend these clear elastic bands, since they'll blend into your hair color and won't be as visible.

3. Creating a circle on top of your head with the braid. You don't want to wrap it tightly like a bun; instead you want it loose and open in the center, kind of like a braided pillbox hat! (If your hair is really long, you may have to double up the braid, one in front of the other.) When you reach the end, tuck the bottom of the braid under the circle you've created to hide it.

4. Pin the braid in place with mini bobby pins, since they're easier to hide and won't be as noticeable.

5. A few suggestions: I like to make the look a little messier by pulling little strands of hair out at the back and sides, but if you prefer it cleaner, you don't have to do that. And if you'd like, you can pin your bangs out of the way with bobby pins.
Voila! Here's the look, beautiful and timeless. What do you think, my darlings? Thank you so much, Caroline and Jamie! xoxo

P.S. Past hair tutorials, including three twisted buns, the perfect side ponytail, a messy French bun.

(Photos by Jamie Beck for Cup of Jo. Caroline's shirt is from Cardigan, her jewelry is from her own line Brvtvs, and her blush is Tarte cheek stain in Tickled.)